Monday, 6 February 2012

Magnolia - I ♥ u card

Good evening, brrrrr @ the cold weather. I don't do cold. I  like to see the snow and to be the first person to walk on the fresh snow in the garden, love the crunching sound it makes with every step.
But that's as far as it goes, after Ive done the stepping on to fresh snow I am willing it to disappear.
So we have done the Christmas's cards, so  we move through the events of this year and next is valentines day.
So here's a little card I've put together using one of my magnolia stamps and die cutters.
I got the template from splitcoast stampers
If you click on the link above it will take you to the tutorial,
There is a tutorial showing you how to make the basic
 I ♥ u
 card.
 They also have a  template for you  to down load which has the letters  you may use to form the card.
Then you decorate each
of the
letters
to form your
card.
Why don't you give this little card a try. I really enjoyed making this card.


Thank you for visiting my blog. Please feel free to leave comment or ask questions about the cards I make. All comments are truly appreciated.
 bYe ByE
for now
Klare
:O)
x

Wednesday, 1 February 2012

This months paperlane challenge 'inspired by a book' - Alice in wonderland

Well I'm excited to say the Paperlane Challenges are starting again.
This months challenge is 'inspired by a book'

So with a little inspiration from Cas, as couldnt think how to tie the rubber stamps in to the book.
for my 'inspired by a book'
Alice in wonderland by Lewis Carroll which was wrote in 1865.Originally the book was called
Alice's Adventures in Wonderland but was commonly shortened to Alice in Wonderland
It is still a very popular book and enjoyable to both young and old.
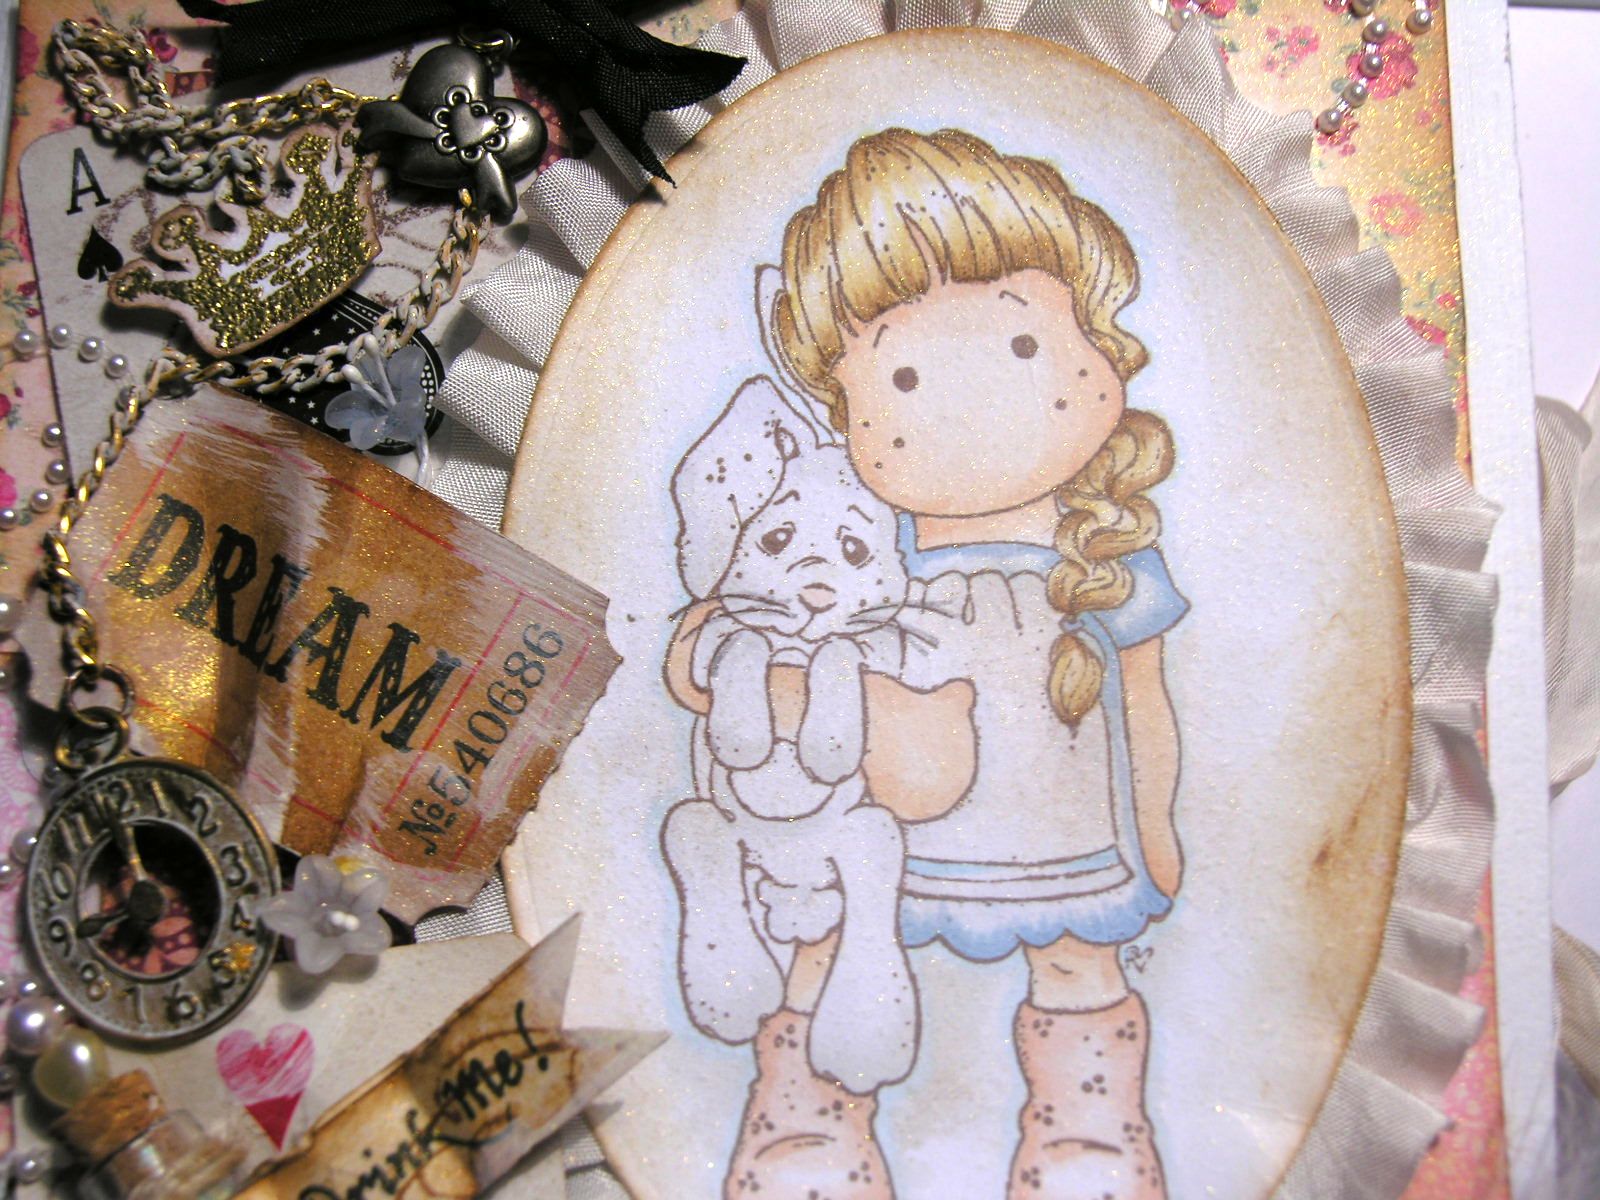
So on the cover of my book card I wanted to include many of the key elements of the book .
Used magnolia stamp to portray Alice and of course the white rabbit.
Added some Tim Holtz tickets distressed with vintage photo ink,
white paint and homemade glimmer mist.
Stamped and coloured with copics the toadstools.
Just behind the handmade  red rose is the Cheshire Cat.
For the bottle I used a Tim Holtz bottle , added perfect pearls and glossy accents, added the label an the gold key so she can grow small to enter the small door.
Added a watch charm as the white rabbit was late of course
Added the playing cards the crown and the heart charm  to represent the queen of hearts.
View from the side.
Inside my book card is a scrapbook mini album
you untie the ribbon closure
and open the little door and inside is a quote from the book.
This then opens to revel pocket pages.
In the pocket is a small tag. and a larger tag that slides out of the top of the pocket page.
Each tag has a quote from the book, theses can be used as photo mats or for you to
journal on the back.
over the page
Here's a look at the next pages again tags with quotes.
And here is the back page of the mini.

and lastly the back of the inside of the book with mini album

I got a little carried away on this project. There were so many elements and quotes from the book, that the project just expanded and ran away with me.
I have a few favourite quotes from the book.

If I had a world of my own, everything would be nonsense. Nothing would be what it is because everything would be what it isn't. And contrary-wise; what it is it wouldn't be, and what it wouldn't be, it would. You see?”

“If everybody minded their own business, the world would go around a great deal faster than it does.”    


“Speak in French when you can’t think of the English for a thing--
turn your toes out when you walk---
And remember who you are!”

 So now its your turn to show us on the paperlane challenge blog
A book that's inspired you!
Thank you for visiting my blog. Please feel free to leave comment or ask questions about the cards I make. All comments are truly appreciated.
bYe ByE
for now
Klare
:O)
x




Tuesday, 24 January 2012

Lili of the Valley- Summer Days stamp

Hi,
Not posted anything for a while, Just been busy with the horse and other bits and bobs. Need to get back in the swing of things. So what better way than inking one of my fav sweet stamps from
Love Love Love these stamps. Don't these little girls just look so cute making there daisy chains.
Reminds me of when I was sat on the school field on a warm summers day making daisy chains with my friends.
Used a selection of copic markers to colour the image. Also used shabby shutters distress ink with a dry paint brush to add the green grass and then used a copic marker to add blades of grass.
Used only one sheet of 6x6 design paper from the prima pixie glen pad. Its a bit of a faff on but I like to used my papers economically so I do a lot of cutting and working out how to make my papers go as far as I can. Matted the pixie glen paper on to light blue thin card.
Used spellbinders circles and Lacy circles dies.

Most of the flowers Ive used are from wild orchid crafts added the silver butterfly which I bought from my fav craft shop the paperlane.
The pearl trim I've used here, is usually used on decorated cakes,  bought a reel cheaply think it was £2.79,  and it must have about 5 meters on it. Its good to  look around for alternative decorations for embellishment's for your cards.

I have entered this card in to challenge.
Well that's its from me today.
Thank you for visiting my blog. Please feel free to leave comment or ask questions about the cards I make. All comments are truly appreciated.

bYe ByE
for now
Klare
:O)
x
PS. Date for your diaries the paperlane craft shop are having a free demo day, So why don't you pp along to the shop in Northallerton.
11/02/2012 - FREE Demo Day at The Paperlane. See the poster below!

Monday, 2 January 2012

Gift box

Happy New Year to you all. I am hoping this year will be better than the roller coaster of a year I endured in 2011.So glad 2011 is over with and looking forward to what 2012 has in store for me. 
This gift box its a little late been posted as I made it for a gift I was giving this Christmas. Oh well better later than never.
Made the box out of black card then used a pink and gold design paper

Used so beautiful black lace round the outside
Cut out a buckle shape. To make it stronger used  gold embossing powder back and front of the buckle shape, did this twice both sides. Added the crystals for added embellishments.
 Added the stick on pearl swirl to the lid.
used small magnets to keep the box closed.

Thank you for visiting my blog. Please feel free to leave comment or ask questions about the cards I make. All comments are truly appreciated.

bYe ByE
for now
Klare
:O)
x


Monday, 19 December 2011

All wrapped up

Hello,
So are you ready? As only six more sleeps till our gifts are given, New and old happy memories are shared and made. Or are you like me still wrapping and making gifts tags. So today I just wanted to share with you the tags I have made to go with my gift wrapping paper. Just a little effort and your gifts will look fab.
I needed tags to go on my gifts, didn't have any to match my paper so made these little gems.
I used lost and found paper, this was from my scraps box, Cut the tag shape free hand. Added some silver stickles and did a scroll pattern. Added the glitter glass to edges to give the frosty ice appearance to edges. Added the spellbinders shapeabilities Fleur de lis pendant to top of tag this was folded in half then secured with eyelet.
Then I cut out Tim holtz bird from the caged bird die cutter. Cut him out in card, took a page from my old falling apart dictionary and cut the bird out again, glued this to card. Used my embossing pen to add ink to places I wanted the embossing powers to stick too then added gold embossing powder and heat set. Did the wings the same way but after heat setting the gold embossing powder, went over again with embossing ink pen and added black embossing powder and heat set again. This gave the two tones of colour on wings. Added few feathers.

So here's the finished look. Added rustic twine and little bell. Tied bow around gift and added the tag.
Hope you all have a lovely Christmas.

Thank you for visiting my blog. Please feel free to leave comment or ask questions about the cards I make. All comments are truly appreciated.

bYe ByE
for now
Klare
:O)
x

Saturday, 10 December 2011

Simply Gorjuss - Snowman stamp card

I liked the the tissue box I made for the the paperlane challenge - unconventional Christmas colours challenge.. (which is still and active challenge so hurry and get your entries in. This months prize is a copic markers storage case) I have 2 of these for my copic markers and I love it. So get your entry in to try win your copic markers storage case.
So as I was just saying I loved making the tissue box that I had to make a card to go with it. So this card has a lot of the same elements and technique's as the tissue box.
So the stamp of the snowman I used is by Simply Gorjuss
To picture the glitter on this card ( there's lots on this card trust me) is very hard to get it to sparkle on camera. Must be a little camera shy.
The card looks so much better in person.
I used the organza snowflake fabric again over the black card for extra sparkle.
There is so many layers and so much happening on this card but it all works
fabric over black card
white card layered with black swirl paper enhanced with stickles on swirls
memory box FROSTYVILLE BORDER Craft Die
also used the magnolia doohickey die
matted and layered the image
coloured with copic marker pens and added glitter glass
added some  holographic snowflakes thats I have had for years
also added black stick on crystals
topped off with a white snowflake chocolate box tied bow.

Thank you for visiting my blog. Please feel free to leave comment or ask questions about the cards I make. All comments are truly appreciated.

bYe ByE
for now
Klare
:O)
x
 PS Debbie dolphins is having a little give away for a cute this cute stamp


Just click on link above for her blog and follow the instructions to entered in the draw for that cute stamp.

Thursday, 1 December 2011

Unconventional Christmas Colours - This months paperlane challenge

Good Morning, This months challenge at the paperlane Is
So the colours that are out of bounds are Red, Green, and Blue!!!
So for this  Challenge I thought I would make a cute little tissue box. With this been the season we tend to get sniffles a snuffles. I think this will look great on your desk and would make good little gift to cheer someone up whos got a snotty nose.
So my unconventional Christmas colours were, blacks, grey, with a hint of purple
I really enjoyed making this. I used the pocket sized packs of tissues, Made the little box for tissues to go into, using my score board. Used spellbinders die to cut out tissue window
Added the back board to tissue box ready to decorate.
Don't you just love this cute snowman stamp by Simply gorjuss.
I coloured him with copic markers then added glitter/glass. Its more like crushed glass than glitter. The name of it escapes me, but the sell it at thepaperlane 
Anyway I added this crushed glass to the head of the snowman and to parts of his body. Also to the snow drifts. The snow drifts were created by making a paper mask,  I ripped up post - it note paper
To give the ragged edge put it on image and used black on cut and dry foam to sponge on the drifts.

For the background I used the resist technique. After stamping the snowman I masking him off, Then used the snowflake stamp with versa embossing ink, added embossing powder, heat set it.
Then used black ink with the cut and dry foam over the stamped snowflakes,
to created the snowing night sky.
I used the beautiful black / grey coloured papers behind image. Cut to size layered it on white card.
Added silver stickles to the swirls on the paper. Added the ribbons. The Martha Stewart branch punch was used to add a little extra decoration. The sentiment I have used is from Craft stamper magazine. which you can buy from paperlane. I used the black crystal stones for snowman's eyes and around the card to add extra sparkle. Used the Tim holtz vintage market die to create the lettering.
Think that's about it. If I missed anything out and want to know how I did it. or what I used, just drop me a comment.

I hope you like it and that I have inspired you to join us this month paperlane challenge
 No reds, greens or blues!!!
If you click on the link above you will be able to see what lovely creations my fellow DT member's have crafted to give you some inspiration.
Now show us what you can do.

Thank you for visiting my blog. Please feel free to leave comment or ask questions about the cards I make. All comments are truly appreciated.

bYe ByE
for now
Klare
:O)
x

Related Posts Plugin for WordPress, Blogger...