Tuesday, 9 October 2012

Oh Christmas Tree - Lili of the valley card

Well there certainly a chill in the air my heatings on full time now, and the jumpers that never went away all year are now joined by scarfs and next will be mittens. brrrr, and I'm still cold sat by this window in my little cubbie hole under the stairs like a little mouse.
From the title yep you have guessed it
...its a Christmas card for this post. This cute little stamp is from Lili of the valley
and its called  Oh Christmas Tree.
I coloured this cute little scene with Copic markers, and polychromos artist pencils
I did have a list of the colours used but... I have misplaced it sorry.
Here are the cute little roses I made from the same card I used to matt, and layer
I added some glitter to edges once I glued them in place. For the fern type foliage I used the marther stewart branch punch.
And here is how i finished off the inside of the card. This again is a lili of the valley stamp.
The snow flakes are a mixture of a martha stewart punch and a die cutter from Cherry lynn -snowflake dies.
Oops Sorry I have just scrolled back in my blog and found I did a very similar looking card to this a month or so back ..lol even used some of same colour combos and papers.
Will try not to do something the same next time. Must have been a look I liked to do something so similar.. (think I should have passed theses off as a series than admit my mistake of doing two cards very similar .. you wouldn't have known ..lol)
 Thank you for visiting my blog.
Please feel free to leave comment or ask questions about the cards I make. All comments are truly appreciated.
bYe ByE
for now
Klare
:O)
x
 

Friday, 28 September 2012

Autumn Coloured Distress ink card

Hello again I like to try different styles and ideas for cards, so today's cards is different to what I usually do. But I thought it compliments  the stamped image beautifully.
For this card I used a range of stamps I have. There are Tim Holtz stamps
swirl stamps. The main image is called wonderland  by Molly Harrison
The background was created with Tim holtz distress inks
Dried Marigold and Aged mahogany. I also mixed some perfect pearls in gold with some water and put in to spray bottle. Sprayed whole area then added a few drops to the distressed card. Dried the card using my heat gun and then ironed the card to make it flat again as when you add water and heat the card tends to curl a little. Then Istamped background card with all different stamps with distress inks and other ink pads i had to hand used blacks,brown and the aged mahogany.
The image was coloured using copic markers
Skin :E000,E00,E11,
Hair : E29,E37,E11
Dress :Y38 YR07, R27, R29, E37
Wood frame :E59,E57,G94
Flowers : YG03, BG34
Added glamour dust glitter to image and background.
For wings lightly sponged with distress ink.
 
Hoped you enjoyed today's card. Just a few more little bits of news I want to share with you.
I entered one of my cards in the Whoopsie Daisy challenge and I am pleased and totally delighted that my card was

That's not all I have to share with you. As some of my regular bloggers are aware I have been busy getting some of my crafted items together and entered them into the local show. I was totally shocked and delighted when the judges had made there decisions of who work was worthy of  recognition.
I did very well I entered 3of my greetings cards in one of the classes and was totally floored by receiving not only 1st, and 2nd, also 3rd place in that class. I also received a 1st place in Olympics inspired greetings card. Another 1st place for my handcrafted Christmas Decoration. Also a 3rd place for my handcrafted flowers.
 
Thank you for visiting my blog.
Please feel free to leave comment or ask questions about the cards I make. All comments are truly appreciated.
bYe ByE
for now
Klare
:O)
x

Tuesday, 18 September 2012

Windy day -Saturated Canary

Hello,
I have not posted for a few weeks as I have been busy. Few things on my mind , cant change them but I can try take my mind off them and, what better way than with a spot of crafting.
So treat myself to a new stamp from
Saturated Canary - windy day
these stamps seam to be very popular at present. My favourite craft shop has just started to stock this range of stamps. so here's my card
A simple little card. Usually my cards can be very busy but this one just seamed to look right without to much fuss.
Just used my copic markers to colour this image.
Skin : E000, E00, E11,R20
Hair : E29,E25,E21
Dress : V91,V95,BG000,B00,V000,R000
Kite: BG000, R000,E33
Flower: V000,G82
Eyes: G82
Outline of image :C0,C1,C2,C3
I also added glitter but camera does not show up how pretty and twinkling the image truly is.
For the embellishments to this card it was just simply lace and ribbon scraps, Buttons  and some pearl trim a few frosted plastic flowers dotted in as well.
The papers used were from prima - fairy belle 6x6 paper pad,  just added glitter boarder to compliment the beautiful paper.
 
I have entered this card in the
 
Hoped you enjoyed today's card.
Thank you for visiting my blog.
Please feel free to leave comment or ask questions about the cards I make. All comments are truly appreciated.

bYe ByE
for now
Klare
:O)
x
 

Saturday, 1 September 2012

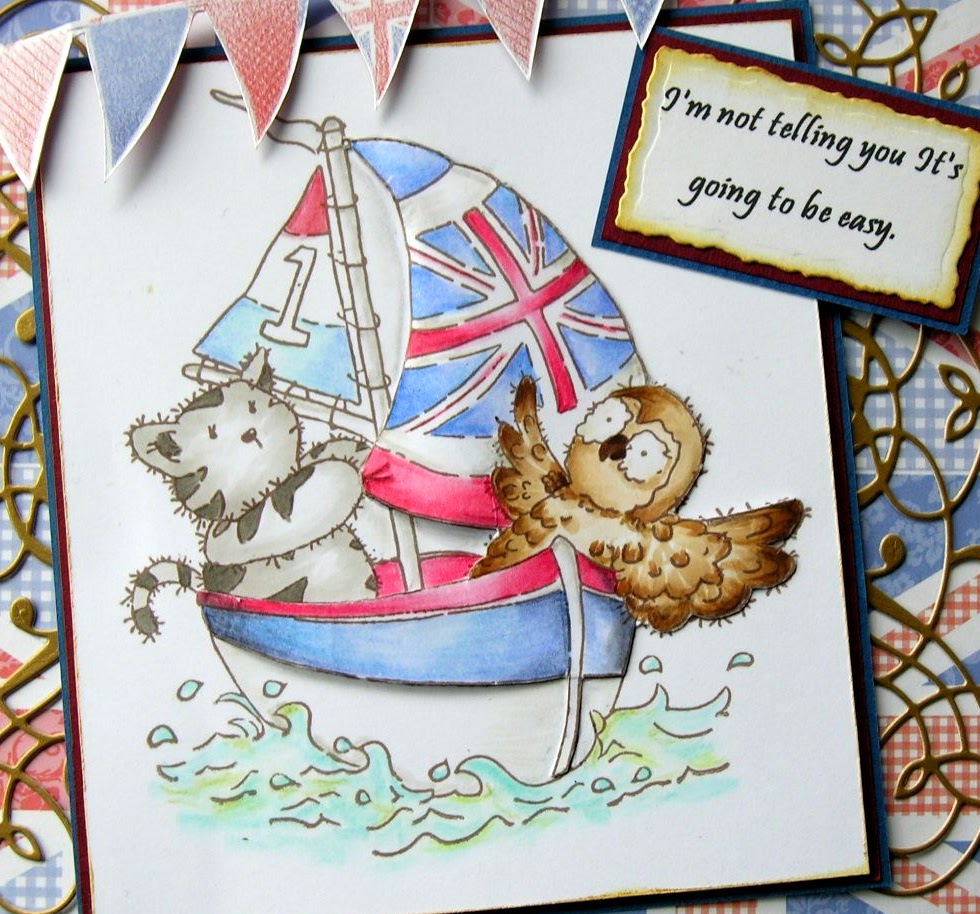
The owl and the pussy cat sail away. The London line clear stamps. Handmade fabric flowers.

Hi,Well it was last day of summer yesterday.... did we even get a summer. Nights are drawing in time to cosy up in craft room and get creating.
I am still getting my entries ready for the local Agricultural show  (3 weeks left)
but its a slow progress.
So here is the card I have made for one of the classes
it has to be an Olympic inspired card.
So made and easel card so when I put it in show you will be able to see the inside of the card as easy as the outside.
The stamped image was coloured using mainly faber castell polychromo pencils
Pencils where used for the sails and the boat also for the water.
The owl and the pussy cat were coloured using my trusty copic markers.
and for the inside I added a chocolate medal which adds a little extra gift to the card.
The die cut used on the inside and the front of the card is a memory box die.
The sentiment is just typed in PC and then printed onto card.
I tried to keep the card simple.  worked on getting the colouring right
I'm pleased how it turned out.
 
Sneak peek of what else I have been trying to make.
 Not sure how, or what I am going to do with them yet.
Flowers. I need to make handcrafted flowers for another entry.
So this is what I have come up with.
They were easy to make. But take time  You need to cut all the petals out
I used dress lining fabric. Then you gently heat the edges over a candle and because of the type of fabric used it curls and seals the edges. Then I threaded all the petals on to florist wire and put a few stitches and glue in place to secure the petals. The centre of the flowers were made by sewing beads to a pom-pom of fabric on the end of the florist wire I used to add petals to.
Here is the attempt at making a ribbon rose.
Not sure what to make with them yet . Thought about on top of a gift,
or maybe hair accessories. I don't know what do you think?
any suggestion's
 
 
Hoped you enjoyed today's card.

Thank you for visiting my blog.
Please feel free to leave comment or ask questions about the cards I make. All comments are truly appreciated.

bYe ByE
for now
Klare
:O)
x


Wednesday, 22 August 2012

Bookmark

Hi again, did'nt want to do 1 great big long post with picture overloads so just doing a smaller ones.
I been busy making book marks. We have a Agricultural show coming up in September and I am busy trying to get my entry's ready for the craft tent, and one of this years category's  is Bookmarks. I thought I would give it a go. So I got to work and have made 1 to enter for the show.
This is the 1st one , Used Magnolia stamps for this one. The book stamp was perfect, I just repeated the book image till I got it to the length I wanted then coloured with selection of copic markers.
I added the magnolia small frog stamp to the top and he was coloured with copic markers.
the small charm I made using shrink plastic, I stamped frog image on the plastic with stazon.. be carefull when you come to colour this with your copic markers.
 As the stazon ink it tends to bleed if touched with copic markers and will ruin your markers.
 The other option is colour with colouring pencils..
Put your hole to hang charm before you come to shrink it.
To shrink it just use your heat gun keep moving it around to distabute heat evenly
It will curl and shrivel up and you will think ... arhhh No ... but keep heating and it will unferl again.
Let it cool befor picking it up . and hay diddle diddle one cute charm to match your projects.
I also put my book mark through a laminator to make it more durable.
So are you thinking why the froggie for the book mark image ....
Daft I know but it reminded me of a joke when I was a kid.

A librarian was quietly working when three chicken's walked in and jumped on to the counter eyed her and said “BUK BUK BUK” Not sure she was sane she gave the chickens three books and they left. An hour later in walked the chickens again jumped onto the counter, returned the books they had taken earlier and said “BUK BUK BUK” Now convinced she was out of her mind she gave them three books, they took one each and left. This time she decided to follow them. She followed them down to the local pond and stood horrified as they threw the books into the water.Then Mr frog stuck his head up saying....
 “RREDIT RREDIT RREDIT!”

Sorry

Thank you for visiting my blog. Please feel free to leave comment or ask questions about the cards I make. All comments are truly appreciated.
bYe ByE
for now
Klare
:O)
x


James Bear- Deck The Halls (lilli of the valley stamp)

Thank you for pop by to my blog weather your just passing through or a regular visitor. I love to get feed back from your lovely comments, and hopefully  I may inspire you to create your own projects, cards, gifts from viewing my efforts. I have been AWOL of later I know and I am sorry. I know some of you take the time out every week to visit my blog and I trully appreciate that.  I am hoping to get myself back on track and pull my finger out and do my weekly post. (fingers X).
So lets get to it. I have a few things to show you.
so lets start with James bear.
This a stamp from lili of the valley
It just a simple little Christmas card. Used Spellbinders circles to create the base for this card and then spellbinders scalloped circles too. Stamped the image of Jame's bear.
Colour list
(coloured with copic markers and faber castell polychromo pencils)
Star- YR31 , gold glitter added sparingly
James bear- E35, E53, and pencil bistre 179
Tinsel- G82,G94.
Baubles- B37, and red glitter added
Present - YR31, B95, B97, and gold glitter
Shading- WARM GREY III 272, WARM GREY IV 275.
The snow flakes around the edge were cut from
Cherry lynn snowflake dies then I stacked 1 snowflake on top of another with silicone glue to give dimension ( I know I've used this look on my last 2-3 Christmas card posts but I really like the effect)
Added a bit of twine to top of card to finish it off.

Hoped you enjoyed today's card.
Thank you for visiting my blog. Please feel free to leave comment or ask questions about the cards I make. All comments are truly appreciated.
bYe ByE
for now
Klare
:O)
x
 

Tuesday, 7 August 2012

Oh christmas tree - Lili of the Valley stamp

Hello there, Felt like doing another Christmas card for you this week so that's what you have got. I don't usually make to many Christmas cards. I usual buy and send cards or panic make as and when I need them.  But this year I am ahead of myself. I had a little peek into my made cards box, and was shocked to see a few Christmas cards.
This little stamp I purchased a few weeks back.
Yes its another one from my favourite stamp makers
This ones called 'Oh Christmas Tree'
Colours used
Skin - E000, E02,R20
Him- Hat, YG91
Coat,YG91
Trousers, E71
Gloves, E71
Scarf, Y21
Shoes, W2,W5,W7
Her- Hat glitter was added from hat coat trim
Bow on hat , R59,R37,R27
Holly, G94,G82
Coat, R59,R37,R27
Mittens, R27
Boots,W3,W7,W5
Trees,G82,G94,YG95, E57,E59
Stool, E35,E37,E29
Inside of card was stamped with another of lili of the valley stamps
The Christmas sentiment was added to the stamped postcard image
This card was made in the easel card style.
OK that's all I have to share with you today.
enjoy the rest of your day.
Thank you for visiting my blog. Please feel free to leave comment or ask questions about the cards I make. All comments are truly appreciated.
bYe ByE
for now
Klare
:O)
x
Related Posts Plugin for WordPress, Blogger...