Showing posts with label glamor dust. Show all posts

Wednesday, 7 November 2012

Summer flower tilda-Magnolia stamp

Surprise ...... no Christmas card today and snowflakes.
Thought I should do something other than Christmas as I needed to as I am feeling a little overdosed on Christmas. Its only November and Christmas stuff has only been in the shops since October. It starts earlier and earlier each year, But in one way its good as it helps you start your shopping and spreed it out a little.
So I inked up Summer Flower Tilda and coloured her with delicate mauve shades.
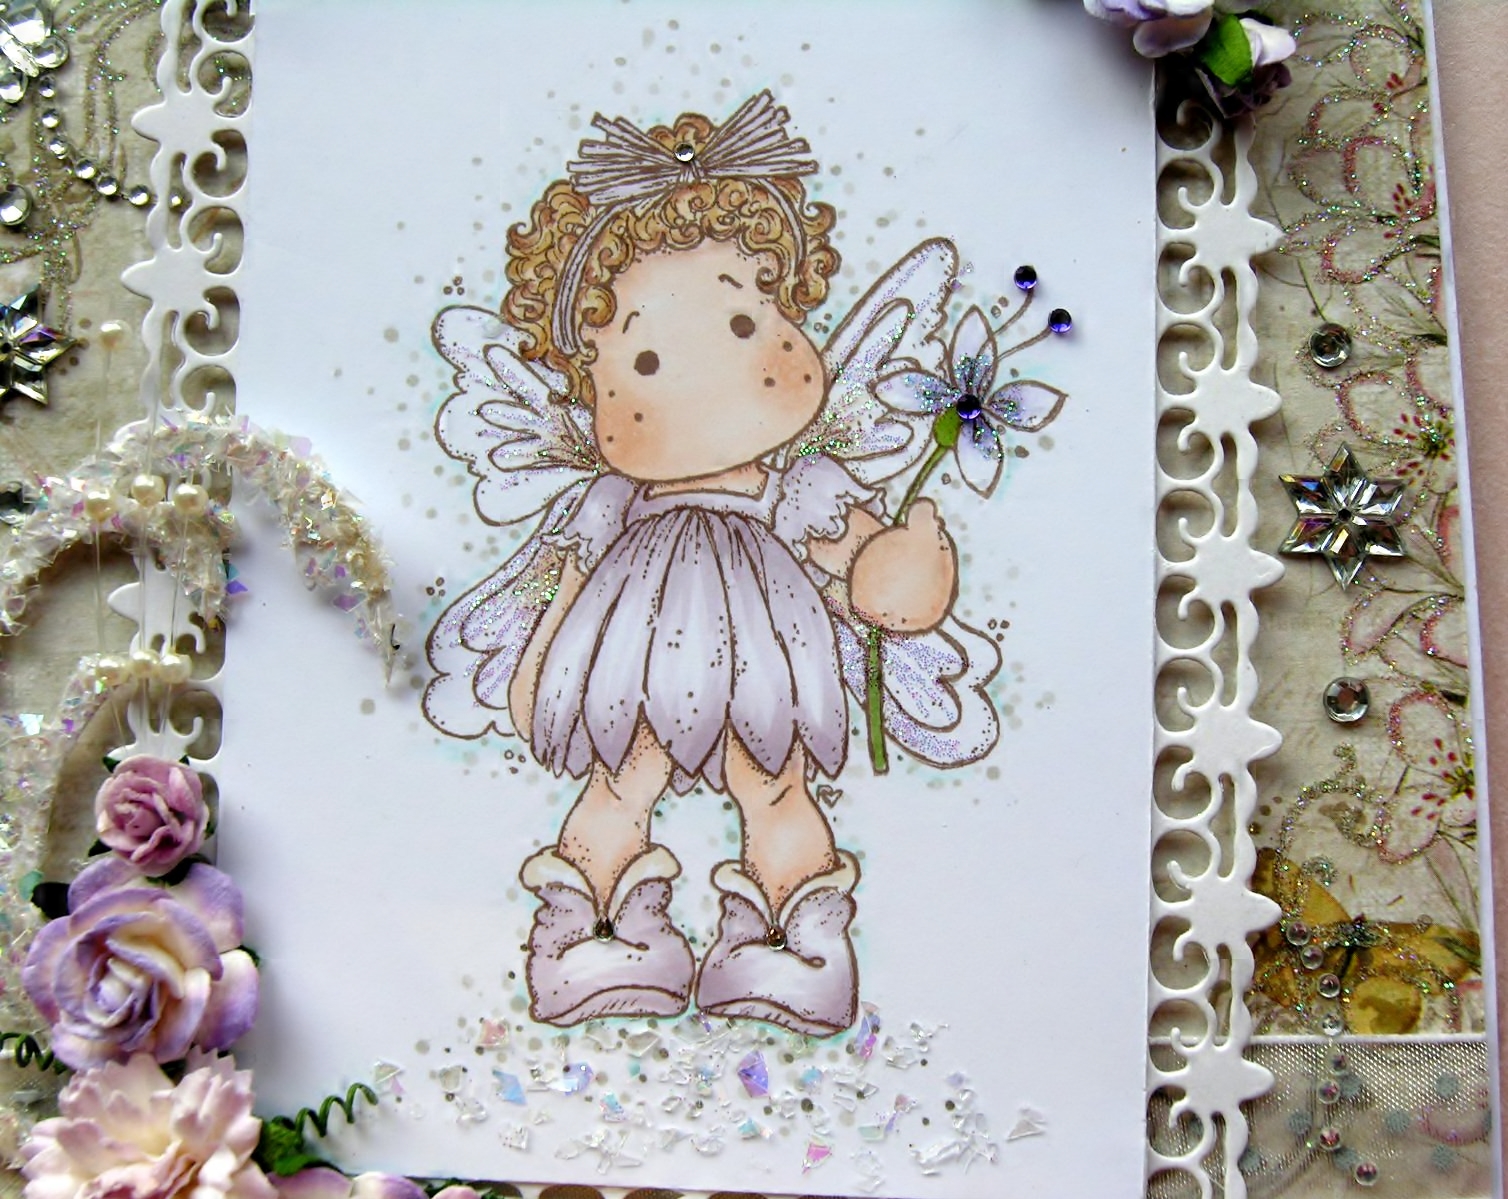
 
I've coloured her with my usual combination of copic markers with a touch of polychomo
pencils
Skin : E000,Light Flesh 132, Medium Flesh131, Cinnamon 189
Hair: E50,E31,E35
Dress, Shoes and Wings :V91, E41.
Flower : BVOO, YG63.
I added dots for shading and interest. used W1,W3,W5.
Also added light cobalt turquoise 154 to outline little areas of image.
I have used a glue pen to outline flowers on papers (prima fairy bell) then sprinkled with glamour dust. At her feet I used Cosmic shimmer Glitter jewels glitter flakes.
Used Wild Orchid Flowers is a a similar shade to match with image.
Added a  Tim Holtz elegant flourish sprinkled with the glitter flakes.
Needed to cut flourish up and add it to assent the flowers.
Inside of card just same paper with added glitter and small corner of ribbon.
Few other little touches were using a border die to edge image, Ribbon, and few stick on crystals for flower centre, also on edges just to fill a space and add sparkle.
 
 Thank you for visiting my blog.
Please feel free to leave comment or ask questions about the cards I make. All comments are truly appreciated.
bYe ByE
for now
Klare
:O)
x


Friday, 18 May 2012

Penny Black stamp Gift Tag

Hello, Sorry I have been a bad blogger of late and not posted anything for little while. But you know how it is life gets in the way of what you would rather be doing at times.
Today post is only a little project but may help to get your creative side flowing. and this little idea is a lovely way to give a gift or take along to  BBQ as a hostesses gift  (lol I know been a bit silly. weathers not ready yet for BBQ'S).
So LETS GET STARTED
Take one of theses
6
a nice bottle of fizz
then
6
Take some transparent cellophane wrap this one had some flourishes printed on to it.
You can get this cello wrap at a florists or some greeting card shops sell it. Or try EBay
so what I did was take about 1 meter length gather it up around the bottle neck and secured with a ribbon tied in a bow.
I then made this gift tag to go on to the bottle.
I used a Penny Black stamp . I had this years but have not used them for a while. ( Note to myself look through and use some of my older stamps more often)
The image was stamped and coloured with copic markers and polychrome pencils. and didn't have a gold pen to do the edge of the bath ... but did have a gold stamping ink so I used a paint brush and smudged it where I wanted it. I used Xcut die for the frame and magnolia die for the pink vine type flourish.  The bubbles in cats bath tub were done using pearl decor pen to make them 3d. I let them dry and added more pearl bubble blobs to give more dimension.
To the top of the bottle where cello is gathered. I added some pearl sprays and attached some die cut butterflies. This is a memory box die.
Here is the finished item.
What i have done before is add wrapped chocolate's  loosely scatted inside the cello wrap then tied securely at the neck ( mmmmm Lindor Chocs my fave )
As you can see i also added a few bows there at the neck of the bottle.
I am sure who ever you give it to will be delighted with the effort you have gone too not only with there bottle of bubbly but how lovely it was gift wrapped.

I hope to get my self sorted and get back in to my  crafty room.
I did make a card to go on to my blog but....
it was not coming together right so that when in to bin..  opps.

Thank you for visiting my blog. Please feel free to leave comment or ask questions about the cards I make. All comments are truly appreciated.

bYe ByE
for now
Klare
:O)
x


Monday, 13 February 2012

Magnolia sitting on a swing card.

Good afternoon, The weathers a little bit warmer but I still have goose bumps on top of goose bumps. I really feel the cold. Give me a hot place any day. Roll on summer and hurry up about it.
Hope some of you popped along to the paperlane Demo day in store on Saturday.
Poor Cas had a few glitches, what with the power in store going off and of course everything these days been powered by electric was a bit of a nightmare for her so Big HUGS TO HER.
I popped in to see the  wonderful new stamp range  that my fellow D.T. member (Bev)  launched at paperlanes demo day.
Click here to see her work and the new
Uniko Studio's stamps.
Greats stamps, lovely quality, Also simple clean designs and up to date with toady's modern trends. I tried the cogs and pocket watch stamps at the make and take demo. These would look fab on any mediums you use your stamps on, and you get a lot of stamps for your money. Not only that the packaging is fantastic, Fabulous storage for your stamps, also keeps them clean and dust free, clearly labelled. They are currently on sale at
the paperlane Northallerton.

Made a card on Friday to share with you.
Thought I would try a tent card and here is the results of my efforts
Papers used were Prima Pixie glen,
Used the magnolia swing stamp and Tilda sitting upon it.
Swing I mounted it with eyelets and chain so it would actually swing back and forth.
The arrangement of flowers are a selection I placed together. These are from
The base of the tent card I had to cut in an oval  so when the card was close the base piece when folded didn't show in the main oval window.
Also added a few little embellishment's like ribbon and buttons and small dummy charm, as the card was for my daughter on the birth of my 1st grandchild.

Thank you for visiting my blog. Please feel free to leave comment or ask questions about the cards I make. All comments are truly appreciated.
bYe ByE
for now
Klare
:O)
x

Tuesday, 1 November 2011

Snow flakes and Sparkles- Gingerbread house (molly bloom stamp)

Hi, Well this months challenge at the paperlane is Snowflakes and Sparkles. This Challenge was set by my fellow Design Team member Kerry. Why don't you go and cheek out some of her lovely cards she makes on her blog paw pads and inkpads. You can also find the other lovely ladies who are on the DT for the paperlane .They all do such lovely work and I'm sure they would love you to pay them a visit to their little crafting blogs.
Well this is my card  for this months challenge. I had this idea for this card sitting in my head since they released the Molly Bloom stamps for Christmas back in September time.
This is the front of the card. I used Lost and Found paper for the front of the card and embellished it a little, It didn't need much as, I wanted the inside of the card to be the main focal point.
The window is cut out from a template I found free on the Internet. I cut 2 of these out one slightly smaller and layered it on top. My template didn't have window sil so added that as an after thought. For the glass in the window I used and acetate sheet. Stamped it with a Great impressions snowflake image and  versa mark embossing ink and then sprinkled white embossing power, heated to set. I wanted to create the scene of you looking out of the window onto.
And here is the view from your card created window.
Just loved this stamp as soon as seen it. I just knew what I was going to do with it.
I stamped the image about 3 times. Then started planing which parts I was going to cut out to layer.
I started with the trees I cut all the parts there were to be covered in snow. Then the house its self was cut out. and its little window also.Then I cut out the sweet path and the lolly pops and jelly sweets.
For the snow on the trees and house roof, I used puff paint but it didn't puff up,maybe because it was ment to be used on fabric. But did  add texture this was then sprinkled with glamour dust. I also added stickles to create icicles along roof edges.
I thought I would add a little extra to the ginger bread house. So I cut around the door added a stick on pearl (changed pearl colour by adding colour with copic) to make door knob. So when you open the door you are greeted by a little gingerbread man all ready to come out and play with the other two whom are outside, having a little snowball fight. The little gingerbread men are a molly bloom stamp also. (Gingerbread garland Christmas 2010 range) I cut these out and coloured with copics.Added some pearl pen to create the little snowballs.
To give you a place to write your sentiment I added a tag that just slips behind the image.
I just used a postcard cut it to a tag shape. Distressed it with walnut stain. stamped with Christmas sentiment. Added some more glitter, a bell tied on with rustic twine.

I hope you like it and that I have inspired you to join us this month paperlane challenge. 


Thank you for visiting my blog. Please feel free to leave comment or ask questions about the cards I make. All comments are truly appreciated.
bYe ByE
for now
Klare
:O)
x
p.s. Why dont you cheek out debbie dolphins blog she's got some cute candy to give away


Monday, 24 October 2011

Nellie Snellen - fairy on present (christmas card

Thought I had better get started as Christmas is not far away ... only 61 sleeps. So made a Christmas card to share with you. Ive had this little stamp about a month sitting on my desk. Its a Nellie Snellen stamp and shes just a little cutie.
I used lots of glitter in this card Yet picturing glitter and getting it to sparkle on my photos is difficult to show you effectively.
The fairy image was masked off. Then the  background was stamped with a
 Great Impressions wooden stamp.
I stamped it with chalk ink pixie pink. Then I added holographic embossing powder I have had for years, Heated it to set the embossing powder. Then I coloured fairy with copic markers.
Added lovely bronze gold coloured glitter to stars on image and glamour dust to fur trim of her jacket
layered my lace, ribbon and daisy trim that I think looks like snowflakes,added button clusters.

Don't know if you can see from pictures. I used some of this organza glittered snowflake fabric
over the top of my design papers. I have had it a year, seen it thought it looked lovely, bought it then thought what do I do with it. Then had a light bulb moment... I will layer it over the papers and it worked well with this card.

Thank you for visiting my blog. Please feel free to leave comment or ask questions about the cards I make. All comments are truly appreciated.
 
Oh don't forget only a few days left to get your entry's in for the thepaperlane challenge
Glitz and Sparkle is this months challenge.
bYe ByE
for now
Klare
:O)
x


Tuesday, 11 October 2011

Magnolia- Blowing bubbles

Hi, I have a new card I have just finished to share with you today.
I am getting in to my magnolia stamps now. Its funny as when first seen the magnolia stamps, I was none to keen on them. It was the fact their was little expression, as the mouth was an absent feature in these stamps. But now I like to work with them. What I like about the range, are the other stamps that you can use with them to create your own little scene. eg toad stools windows, paths, walls etc (note to self must invest in some of those stamps)
Anyway lets get on with the bit you have come to see. Showing you the card.
My good friend Caz, lent me one of her magnolia stamps so I could have a little play.
Decided I was going to use papers from my scraps box as its overflowing.
No toad stools this time, altho I was tempted to add some I can tell you.
But thought you must be sick of seeing them..lol. I like the way the silver glitter on her dress turned out.I used my Quickie glue pen, and just drew where I wanted the glitter to stick. For the finer areas of glitter I just dotted the pen to get the fading effect when the glitter was added. For her wings, I stamped that part of the stamp on some pergamano parchment craft paper, cut them out leaving a tag so I could glue them down to give the 3d effect. also added glitter and some
 distress ink to give them a slight blush of colour.
 I also coloured and glittered the wings on the original stamped image to give more depth.
Added more bubbles instead of toadstools. Made card up and thought I had finished it.Was sat looking at it and thought  this corner was bare.
It was missing something. So stamped some more bubbles on scrap of water colour paper
cut them out, Glued in place and then added glossy assents, while it was still wet sprinkled some decoart glamour dust on to give bubbles some sparkle.

Right I best go now and tidy my craft room. Think I must have had every scrap of paper out from the scraps box to make this card trying to see what worked and what didn't. I coloured the image first then thought hmmmm what papers can I put with this now eek.
But that's how I usually work ... in disorganisation..lol
When I am making a card you cant see my desk for everything I get out.
 As for the floor its a good job I have a laminate floor, easier to clean. its looking very pretty at the moment with fall out of all the glitters I have been using.

Thank you for visiting my blog. Please feel free to leave comment or ask questions about the cards i make. All comments are truly appreciated.

bYe ByE
for now
Klare
:O)
x


Monday, 19 September 2011

Beautiful tilda - (magnolia butterfly dreams)

Hi, Hope you have had a lovely weekend. The sun is shining here at the moment.
But I am feeling the cold.
Today I would like to share my card I made a few weeks ago. From the title you will have guessed its a magnolia stamp From the butterfly dreams collection 2011
only have 2 magnolia stamps at present and this one you have already seen. It was used on the canvas bag I made. But I like to use my stamps over and over again on different projects. So you will see them again been used on new idea's and projects.
I just love the magnolia doohickey dies but they are a little expensive.
but a girls got to have what she like sometimes.
I like the delicate colours you can get by using your distress inks to colour your images.
Still like to use my copic markers, but with inks I seam to get more a of a look I'm happy with. Maybe I just need more practice with my copic colouring.
And here's the inside of the card, simple but compliments the front of the card.
Needed to make a box envelope to accommodate this card as the flowers made it to bulky to go in to regular envelope. I found a tutorial on how to make the envelope on this ladies blog site.
needed to adapt the measurement's to accommodate this card, as it was bigger than 6x6. Used the 12x12 Prima botanics paper for the envelope,
 as I had used paper from same collection 6x6 paper pad for card.
I just love papers that have writing on or scrolls and flourishes, post cards images.

Just a little reminder, the challenge is still open at the paperlane this months challenge is 
"Anything but a card"
So grab your molly bloom stamps and join us.
Entries need to be in by 28th September 2011 and this months lovely prize is a
 character stamp from the BRAND NEW Molly Blooms 'Winter Wonderland Collection'!
The have some lovely stamps in this new collection.

Thank you for popping by today.

bYe ByE
hUgGlEs
Klare
:O)
x


Friday, 9 September 2011

Lili of the valley - dandelion clock

Good afternoon, slow progress on the decorating bedroom situation, hubby keeps saying you cant rush it ...grrrr. sick of dust from sanding celling and walls, already gone through one pot of filler for all the dings & dents in wall. So to get away from it all I hid in my craft room. while he sanded filled & sanded some more.
I pulled out my Lili of the valley - dandelion clock stamp & prima papers
I am really pleased how this card turned out. Usually I think the cards I make are just ok & every one Else's are so much better. But this card I really like.
Got a little stuck at one point & it was close to going in the bin.
 Had gap above image that nothing I put in place worked.
 So left it over night & came back to it & added the banner at top & the butterfly.
Love the toadstools, A new stamp I got last week from
The inside of card, feel it missing a little some thing ...hmmm
may add some more to this yet. Maybe a feather under butterfly ? don't know

Recipe
White card for base
Red paper from the prima botanics collection
Postcard paper from my stash sorry no make wrote on it, as is the green paper
around image.
Image: Water colour paper,
Distress inks to colour image:
 tattered rose-skin
scattered straw-hair
aged mahogany- top, flowers, shoes
milled lavender and tattered rose- skirt, wings
vintage photo- sole of shoes, distress edges
peeled paint - grass & dandelion
broken china-sky
Toad stools
vintage photo-underside of cap, stalk
aged mahogany- tops cap
also used perfect pearls as paint- perfect copper, forever red
pearl pen for white spots
All edges of papers were distressed with vintage photo distress ink
Sew machine - stitch edges of layers
Small bit of scrap lace used just peeping out from taer in paper
Feathers- black feather thanks to my pet chicken, white feather from shops,
black & white spot feather from the guinea fowl at the stable where I keep my horse.
seam binding-was cream dyed it with tattered rose distress ink
Selection of flowers-from wild orchid crafts
 Pearls sprays, & stick on pearls
Dies- ovals,  Magnolia DooHickey Tilda Lace Die,tim holtz baroque
Stamps- lili of the valley- dandelion clock toadstools by kars,
think the butterfly is kars stamp too.
with love stamp is an old one don't know make
Extras- small crystals on flowers are stones I use for nail art they are really tiny
glamour dust on skirt, wings, flower heads, butterflies

Well best get on and do something today
bYe ByE
HuGgLeS
Klare
:O)
x


Related Posts Plugin for WordPress, Blogger...