Showing posts with label polychrome pencils. Show all posts

Friday, 18 May 2012

Penny Black stamp Gift Tag

Hello, Sorry I have been a bad blogger of late and not posted anything for little while. But you know how it is life gets in the way of what you would rather be doing at times.
Today post is only a little project but may help to get your creative side flowing. and this little idea is a lovely way to give a gift or take along to  BBQ as a hostesses gift  (lol I know been a bit silly. weathers not ready yet for BBQ'S).
So LETS GET STARTED
Take one of theses
6
a nice bottle of fizz
then
6
Take some transparent cellophane wrap this one had some flourishes printed on to it.
You can get this cello wrap at a florists or some greeting card shops sell it. Or try EBay
so what I did was take about 1 meter length gather it up around the bottle neck and secured with a ribbon tied in a bow.
I then made this gift tag to go on to the bottle.
I used a Penny Black stamp . I had this years but have not used them for a while. ( Note to myself look through and use some of my older stamps more often)
The image was stamped and coloured with copic markers and polychrome pencils. and didn't have a gold pen to do the edge of the bath ... but did have a gold stamping ink so I used a paint brush and smudged it where I wanted it. I used Xcut die for the frame and magnolia die for the pink vine type flourish.  The bubbles in cats bath tub were done using pearl decor pen to make them 3d. I let them dry and added more pearl bubble blobs to give more dimension.
To the top of the bottle where cello is gathered. I added some pearl sprays and attached some die cut butterflies. This is a memory box die.
Here is the finished item.
What i have done before is add wrapped chocolate's  loosely scatted inside the cello wrap then tied securely at the neck ( mmmmm Lindor Chocs my fave )
As you can see i also added a few bows there at the neck of the bottle.
I am sure who ever you give it to will be delighted with the effort you have gone too not only with there bottle of bubbly but how lovely it was gift wrapped.

I hope to get my self sorted and get back in to my  crafty room.
I did make a card to go on to my blog but....
it was not coming together right so that when in to bin..  opps.

Thank you for visiting my blog. Please feel free to leave comment or ask questions about the cards I make. All comments are truly appreciated.

bYe ByE
for now
Klare
:O)
x


Tuesday, 24 April 2012

Hot Diggity Dog - Chocolates and Mouse

Shhhhh ... don't tell any one but the sun has been shinning here all day ... not a rain cloud in sight... well not  from the view from my craft room window.
Finally got round to making this weeks card today...
I used the cute little mouse sat nibbling on chocolates.
I  used my usual items for colouring copic markers and polychrome colouring pencils
To the chocolate's I added glossy accents
It doesn't show very well but I tried to add extra 3d effect  by choosing parts of the chocolates and adding glossy/a  then let it dry ... then added the next section of glossy/a . So some areas of the choccies were more raised than others.
 You can just make this out on the top of the choccie with red bits.
Here I made 2 bows,  added one on top of the other ... glued a small rose on top and added a cute little  'made with love charm'.
To the bottom corner I added ribbon. Also so more beautiful little flowers.
Made a little envelope  used spellbinders  die to cut out the little greeting card. 
Inked edges and stamped sentiment.

For the inside just added papers I used on front  and a bit of same lace used.
Used a Martha Stewart punch to create the square to write your sentiment's on.

 Off to stables now to enjoy the last few rays of sunshine of the day.
Thank you for visiting my blog. Please feel free to leave comment or ask questions about the cards I make. All comments are truly appreciated.
bYe ByE
for now
Klare
:O)
x

Wednesday, 11 April 2012

Magnolia Bride and Bridesmaid

Morning Tiddly peeps,
Hope you all had a lovely Easter and didn't eat all your eggs at once. Had this stamp months but not made a card with it so it was time to get it inked up and share it with you.
Papers I used are Lost and Found - Blush collection. I think the pink candy stripe paper maybe from Prima ..?  Could be wrong but cant find paper stack for it to cheek as craft desk looks like i've let a small child in their, who got everything out and had a whale of a time.
(me ..giggle...would loose my head if it was loose. I am always mislaying stuff)
Sorry pics a little blurry, this was coloured with copic markers and polychrome pencils
Mainly used a black pencil on the brides hair and the bridesmaids dress and used a paper blending stump and Sansodor which is a Low odour solvent which you can get from art shops. This helps to blend the wax based polychrome pencils.
Used this beautiful Marianne Creatable die just on the corner of the card blank, and used the latticed centres by adding tiny crystals which will add embelishment to inside of card, when opened. They are  so tiny I usually use theses on my nails when I do nail art.
This is the inside of the card. Looking at this picture the inside is looking very plain ...hmm may have to tweak this a little more. But thought the paper with the sentiment on it went well.
The other die used for the image was Tim holtz - baroque die, But had cut card to small to get the whole of the baroque die. So cut the baroque shape down to create this shape.

ohhhh don't forget that thepaperlane Birthday Challenge is still open to entry's
click on link above to go to site and show us your entry for the shops 2nd Birthday. Your entry has to have either 2 sentiments, or 2 Birthday cakes. If your card is chosen.You will get a
£15 VOUCHER TO SPEND IN STORE
You have until the 10th May 2012
to get your entry in.

Thank you for visiting my blog. Please feel free to leave comment or ask questions about the cards I make. All comments are truly appreciated.

bYe ByE
for now
Klare
:O)
x


Tuesday, 3 April 2012

Happy Birthday Paperlane (Tilda Celebrates Midsumer)

Happy Birthday Paperlane, I can not believe that my favourite craft shop is 2 years old. I just love visiting this little shop. Its warm welcoming and friendly and it has the added bonus its sells my favourite things....... crafting goodies.
So to celebrate they are holding a Birthday challenge So why not come and join us and celebrate and you will be in the chance of winning a £15 gift voucher to use in paperlane. So I hear you asking what do I need to do to in for a Chance of winning . Well you need to make a card with either 2 sentiments, or 2 birthday cakes or 2 candles, or you could do all 3.
If you don't have a blog,  no problem please feel free to email your entry, or if you live locally please drop your card into the shop , OR  just click on the little blue frog! on paperlane site to add you entry.

The challenge will be open from today, until the 10th of May, so plenty of time to get your creative juices flowing.Why not pop along to thepaperlane blogspot and see what my fellow design team have made to give you some ideas.
So here is my Birthday wishes for a Happy 2ND Birthday
Front of card
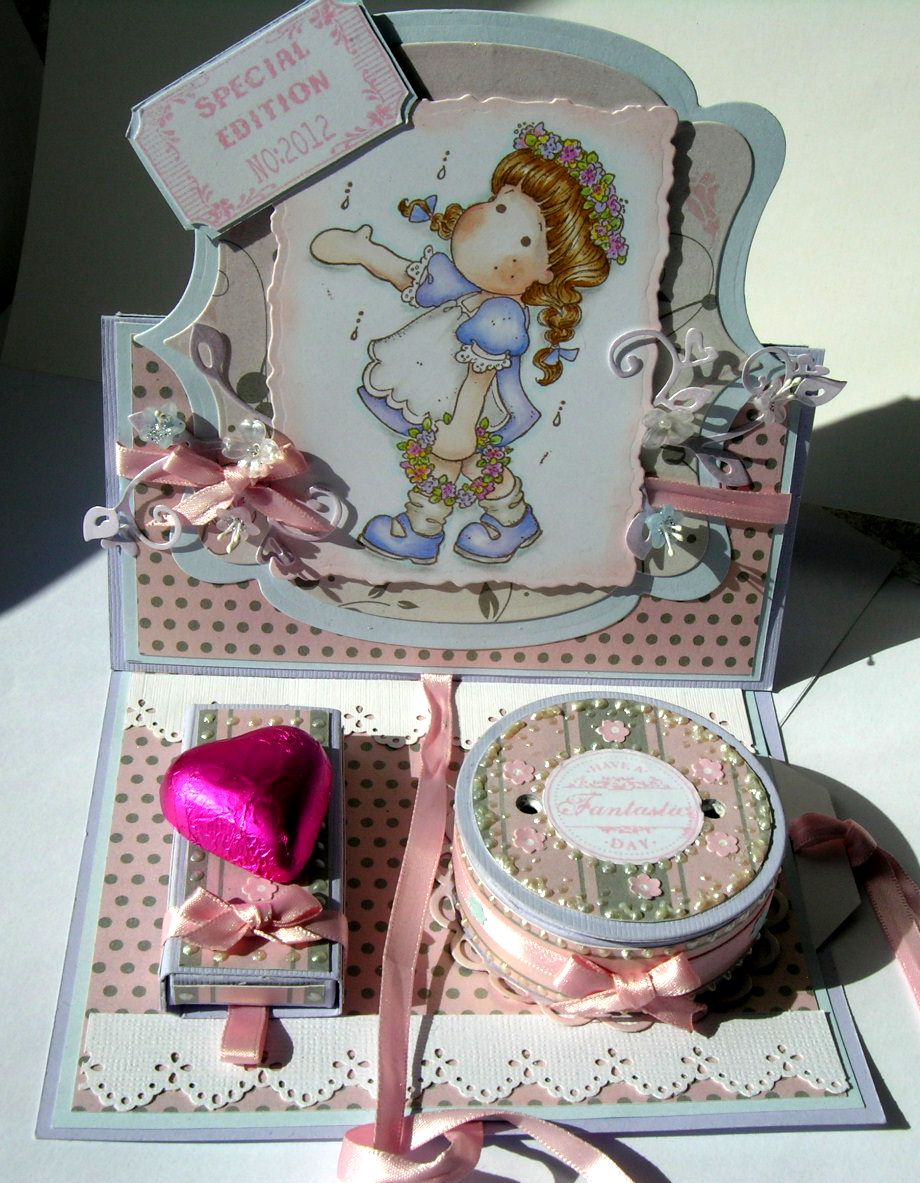
I made an easel card using Tilda celebrates midsummer.
with a few Little surprises.
Inside the little box are the candles for the birthday cake.
And when you lift the top off the cake and in side are a few chocolate hearts.
View from above
 to the side is a slide out tag to write your personal greetings.

So get busy and enter your cards for the

Thank you for visiting my blog. Please feel free to leave comment or ask questions about the cards I make. All comments are truly appreciated.

bYe ByE
for now
Klare
:O)
x

Friday, 16 March 2012

Woodland Scene (Hobby Art Ltd stamp set)

Hello again, Last week I got some lovely stamps from Caz's shop The Paperlane they are made by Hobby Art Ltd, and they do a few different sets but I choose the CS027D Woodlands Scenes set.
Its JUST ADORABLE.
As you can see I have made a card that's a little different to my usual style.
This type of folded card is called a Tri Shutter Card.

here is the top view of the card to see how its folded.
this is the card laid flat.
Here is the first scene, The toadstool and leaves is all one stamp, But in the set you get other little stamps like grass and the mouse also the butterfly,  that can be stamped separately or added to other stamped images of the set to create the scenes you want to make.

In this one I used the cute mouse and added the grass under his feet and then used another stamp from set to make the grassed hill.
On this one the stile and the rabbit are separate stamps but when stamped by using masking they create a scene, added the grass again using the grass stamp in set.
Each stamped scene  was coloured with copic markers and polychrome pencils.
the edges of the card were sponged with distress inks.
To the back of the card I added a little coin envelope with tag to write my greetings on.
Thank you for visiting my blog. Please feel free to leave comment or ask questions about the cards I make. All comments are truly appreciated.

bYe ByE
for now
Klare
:O)
x
Related Posts Plugin for WordPress, Blogger...