Wednesday, 18 April 2012

Magnolia Tilda with hangging bunny. birthday card

Hello again,
This weeks card is one I made for my daughters 19th birthday.
As you can see I used a number of stamps on this card.
From the Butterfly Wishes Collection -Tilda with hanging rabbit
Fairy Tale Collection - Prince Phillip (frog)
and behind the frog Molly bloom stamp -Herb box
Today's image was coloured copic markers.
 I added die cuts and punched flowers
The smaller flowers were made with 2 punches 
the edges were inked with same chalk pink pixie dust ink to match the inked outer edge of main image. Then a small crystal added to centre of each flower.
Here are the punches I used to create the small flowers.
I used lots of die cutters on this card, Magnolia doohicky Doily flowers
Magnolia doohicky - flourish
Memory Box -Spring border
and inside I used Magnolia doohicky Tag

and here is the inside of today's card.
Hope you like today's card, and it inspires you to create your ideas and incorporate them into your
creations and crafts.


Thank you for visiting my blog. Please feel free to leave comment or ask questions about the cards I make. All comments are truly appreciated.
bYe ByE
for now
Klare
:O)
x


Wednesday, 11 April 2012

Magnolia Bride and Bridesmaid

Morning Tiddly peeps,
Hope you all had a lovely Easter and didn't eat all your eggs at once. Had this stamp months but not made a card with it so it was time to get it inked up and share it with you.
Papers I used are Lost and Found - Blush collection. I think the pink candy stripe paper maybe from Prima ..?  Could be wrong but cant find paper stack for it to cheek as craft desk looks like i've let a small child in their, who got everything out and had a whale of a time.
(me ..giggle...would loose my head if it was loose. I am always mislaying stuff)
Sorry pics a little blurry, this was coloured with copic markers and polychrome pencils
Mainly used a black pencil on the brides hair and the bridesmaids dress and used a paper blending stump and Sansodor which is a Low odour solvent which you can get from art shops. This helps to blend the wax based polychrome pencils.
Used this beautiful Marianne Creatable die just on the corner of the card blank, and used the latticed centres by adding tiny crystals which will add embelishment to inside of card, when opened. They are  so tiny I usually use theses on my nails when I do nail art.
This is the inside of the card. Looking at this picture the inside is looking very plain ...hmm may have to tweak this a little more. But thought the paper with the sentiment on it went well.
The other die used for the image was Tim holtz - baroque die, But had cut card to small to get the whole of the baroque die. So cut the baroque shape down to create this shape.

ohhhh don't forget that thepaperlane Birthday Challenge is still open to entry's
click on link above to go to site and show us your entry for the shops 2nd Birthday. Your entry has to have either 2 sentiments, or 2 Birthday cakes. If your card is chosen.You will get a
£15 VOUCHER TO SPEND IN STORE
You have until the 10th May 2012
to get your entry in.

Thank you for visiting my blog. Please feel free to leave comment or ask questions about the cards I make. All comments are truly appreciated.

bYe ByE
for now
Klare
:O)
x


Tuesday, 3 April 2012

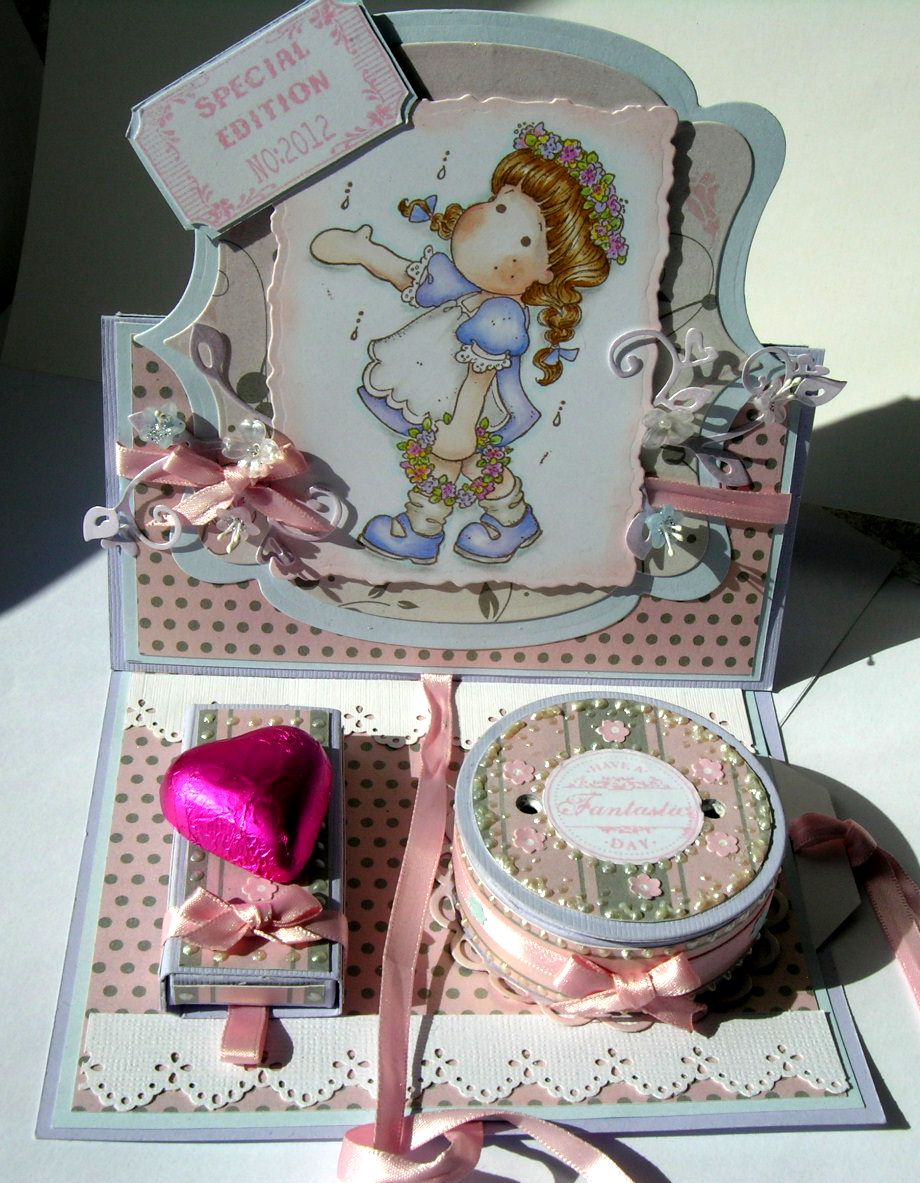
Happy Birthday Paperlane (Tilda Celebrates Midsumer)

Happy Birthday Paperlane, I can not believe that my favourite craft shop is 2 years old. I just love visiting this little shop. Its warm welcoming and friendly and it has the added bonus its sells my favourite things....... crafting goodies.
So to celebrate they are holding a Birthday challenge So why not come and join us and celebrate and you will be in the chance of winning a £15 gift voucher to use in paperlane. So I hear you asking what do I need to do to in for a Chance of winning . Well you need to make a card with either 2 sentiments, or 2 birthday cakes or 2 candles, or you could do all 3.
If you don't have a blog,  no problem please feel free to email your entry, or if you live locally please drop your card into the shop , OR  just click on the little blue frog! on paperlane site to add you entry.

The challenge will be open from today, until the 10th of May, so plenty of time to get your creative juices flowing.Why not pop along to thepaperlane blogspot and see what my fellow design team have made to give you some ideas.
So here is my Birthday wishes for a Happy 2ND Birthday
Front of card
I made an easel card using Tilda celebrates midsummer.
with a few Little surprises.
Inside the little box are the candles for the birthday cake.
And when you lift the top off the cake and in side are a few chocolate hearts.
View from above
 to the side is a slide out tag to write your personal greetings.

So get busy and enter your cards for the

Thank you for visiting my blog. Please feel free to leave comment or ask questions about the cards I make. All comments are truly appreciated.

bYe ByE
for now
Klare
:O)
x

Friday, 16 March 2012

Woodland Scene (Hobby Art Ltd stamp set)

Hello again, Last week I got some lovely stamps from Caz's shop The Paperlane they are made by Hobby Art Ltd, and they do a few different sets but I choose the CS027D Woodlands Scenes set.
Its JUST ADORABLE.
As you can see I have made a card that's a little different to my usual style.
This type of folded card is called a Tri Shutter Card.

here is the top view of the card to see how its folded.
this is the card laid flat.
Here is the first scene, The toadstool and leaves is all one stamp, But in the set you get other little stamps like grass and the mouse also the butterfly,  that can be stamped separately or added to other stamped images of the set to create the scenes you want to make.

In this one I used the cute mouse and added the grass under his feet and then used another stamp from set to make the grassed hill.
On this one the stile and the rabbit are separate stamps but when stamped by using masking they create a scene, added the grass again using the grass stamp in set.
Each stamped scene  was coloured with copic markers and polychrome pencils.
the edges of the card were sponged with distress inks.
To the back of the card I added a little coin envelope with tag to write my greetings on.
Thank you for visiting my blog. Please feel free to leave comment or ask questions about the cards I make. All comments are truly appreciated.

bYe ByE
for now
Klare
:O)
x

Friday, 9 March 2012

It's my party Lili of the valley stamps

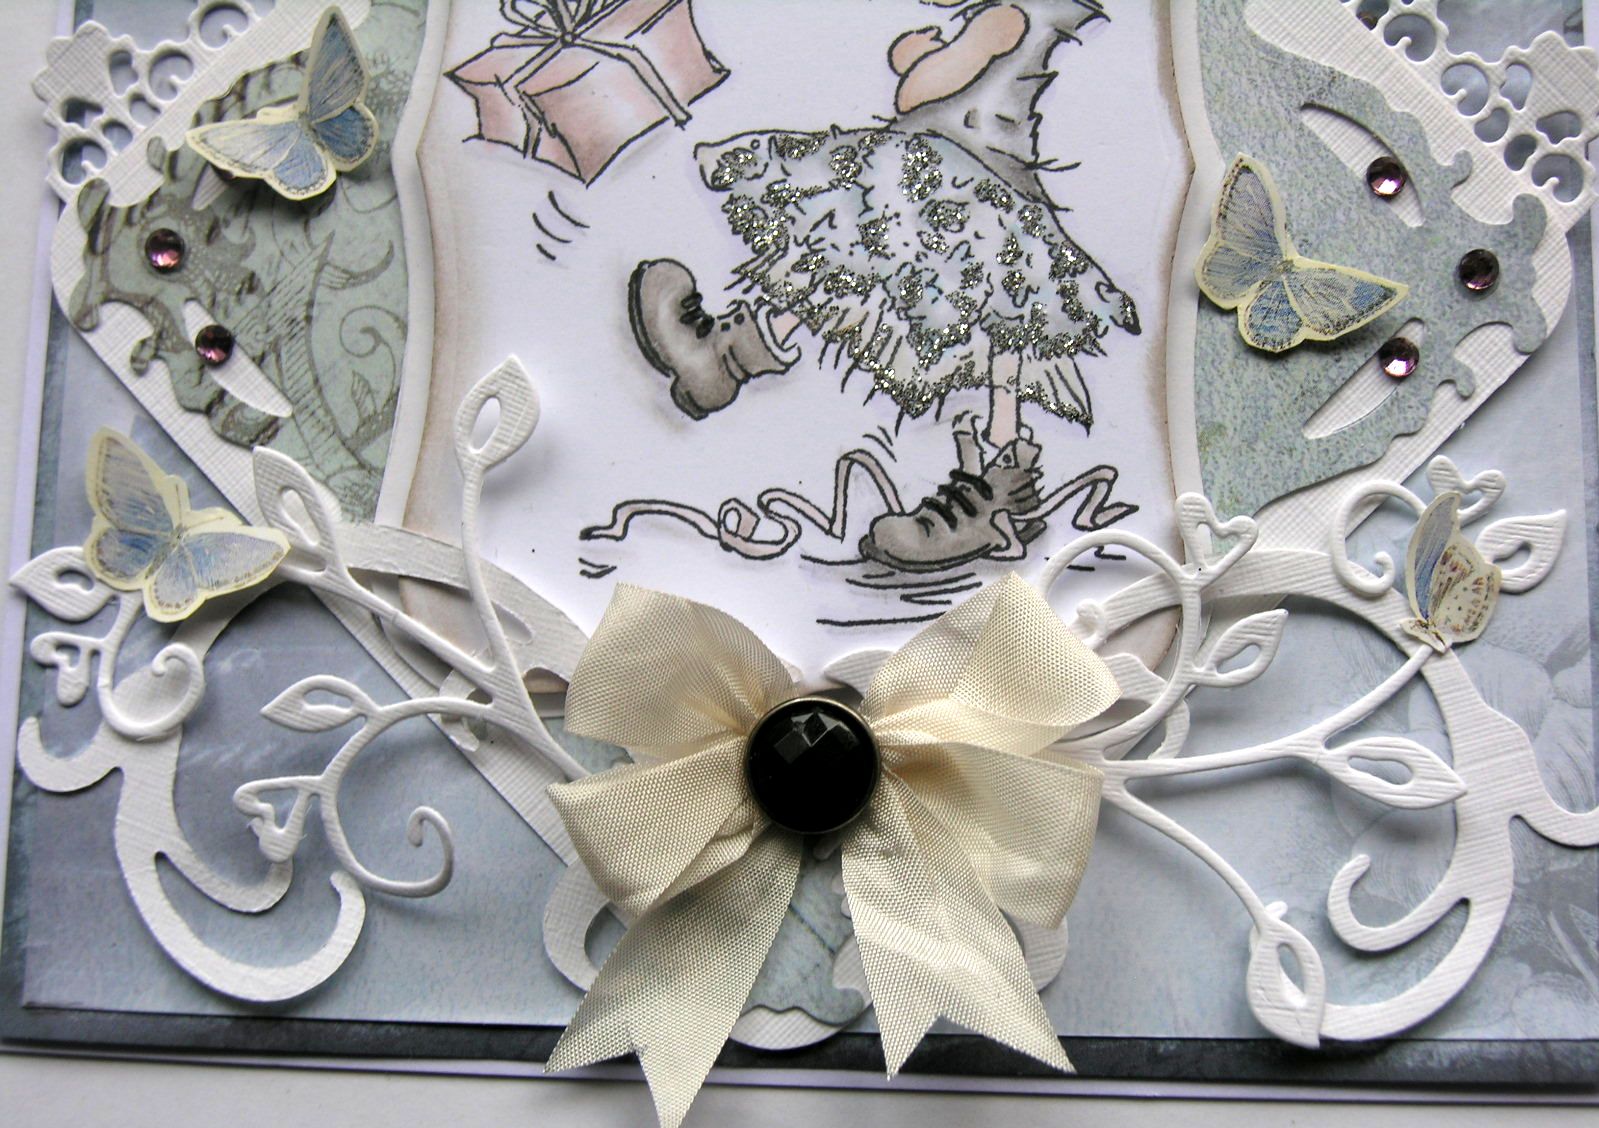
Another week and I have my latest card to share with you all. Just adore this stamp from Lili of the valley  Its called "It's my party" I have posted a card before using this stamp, but couldn't  resist inking her up again to share with you.
The papers I used for this card are from the 6x6 pad called Victorian Classic made by Paper cellar.
They are tones of Gray and Gray/blue that I used from pad.
Here's a close up of the party girl herself. I coloured her with copic markers, Used a selection of cool Grey's and warm Grey's for the top and boots. Usual skin tones, Skirts was coloured too with greys cool and warm but added B000 here and there. A party girl is not completely dresses without a little sparkle so added micro silver glitter to her skirt, and a sprinkling on her tiara. The present was coloured with R000, But to tone down and add shadow and tie colours in with the papers used. I used a mixture of copic markers in the Grey's again but also introduced my polychrome colouring pencils and blended them with sansodor.
used a selection of die cutters to create this part of the card. Added some seam binding and brad to centre of the bow.

Thank you for visiting my blog. Please feel free to leave comment or ask questions about the cards I make. All comments are truly appreciated.

bYe ByE
for now
Klare
:O)
x

Saturday, 25 February 2012

Magnolia's Little Mermaid

Morning, Well its sunny outside think springs on its way, Little lambs are in the fields, and the birds are tweeting and the temperature's making its way up the thermometer.
This month I have made a card to share with you and give you some inspiration and to get you crafting your own creative delights.
So today's card features magnolia's little mermaid stamp.
Cute little stamp isn't she, I used copic markers to colour her, I used a range of blues, greens and blue/greens all the lightest shades of the colour groups with a touch of cool grey here and there, for here fishy scales and shading, you should know me by now we have to have glitter so just picked out a few scales and her tail to add glitter. Used 2 colours of glitter one is silver and the other white iridescent with blues and greens tones in it, which compliments the colours used to colour her.
The skin tones were coloured with the usual combination of copic markers E000, E00, E02.
hair was coloured with E31, E35, E50. The background shading / shadows and tinge of shading on her face was achieved with polychrome pencils.

This picture just shows the stitching on the background layer. It all adds to the embellishment of the card. I only have a vintage sewing machine you know the type you crank the handle round. It was only cheap think it was £25 at a junk shop, But its been worth its money I've used it and better used it, for cards and cushions and the odd horse rug repairs.
On this card i used Kaiser craft peachy keen papers. The blues and browns and pattern on the papers, when so well with the colours I had used with the stamped image. So how do you start your cards? Do you choose the papers ? and then colour your image to compliment the papers? Or do you colour image first then hunt through your papers to see what works?
I do both, sometimes I have a paper I just have to use because I love it and, I have an idea of what I want to do with it. Other times its the stamped image that comes first with the colouring and how I want it to look. Then have to work round it with papers and embellishments to compliment and match. To embellish this card added seam binding, lots of pearls, pearl sprays, lace,
also used the Tim holtz alterations scroll work die, and the Mather Stewart branch punch.
The scroll work die looked like waves from the sea and the branch added a look of coral or seaweed. to carry on the nautical theme to the card.
So that's it your finished card.
I hope I have inspired you to create your own cards and projects.
The paperlane craft shop has many of the items used for this card in store. Some of what I have used is my own stash like the lace.
Thank you visiting this blog. Please feel free to leave comment or ask questions about the cards I make. All comments are truly appreciated.
please feel free to visit thepaperlane blogspot, or better still pop in the shop at northallerton.

bYe ByE
for now
Klare
:O)
x

Monday, 13 February 2012

Magnolia sitting on a swing card.

Good afternoon, The weathers a little bit warmer but I still have goose bumps on top of goose bumps. I really feel the cold. Give me a hot place any day. Roll on summer and hurry up about it.
Hope some of you popped along to the paperlane Demo day in store on Saturday.
Poor Cas had a few glitches, what with the power in store going off and of course everything these days been powered by electric was a bit of a nightmare for her so Big HUGS TO HER.
I popped in to see the  wonderful new stamp range  that my fellow D.T. member (Bev)  launched at paperlanes demo day.
Click here to see her work and the new
Uniko Studio's stamps.
Greats stamps, lovely quality, Also simple clean designs and up to date with toady's modern trends. I tried the cogs and pocket watch stamps at the make and take demo. These would look fab on any mediums you use your stamps on, and you get a lot of stamps for your money. Not only that the packaging is fantastic, Fabulous storage for your stamps, also keeps them clean and dust free, clearly labelled. They are currently on sale at
the paperlane Northallerton.

Made a card on Friday to share with you.
Thought I would try a tent card and here is the results of my efforts
Papers used were Prima Pixie glen,
Used the magnolia swing stamp and Tilda sitting upon it.
Swing I mounted it with eyelets and chain so it would actually swing back and forth.
The arrangement of flowers are a selection I placed together. These are from
The base of the tent card I had to cut in an oval  so when the card was close the base piece when folded didn't show in the main oval window.
Also added a few little embellishment's like ribbon and buttons and small dummy charm, as the card was for my daughter on the birth of my 1st grandchild.

Thank you for visiting my blog. Please feel free to leave comment or ask questions about the cards I make. All comments are truly appreciated.
bYe ByE
for now
Klare
:O)
x

Related Posts Plugin for WordPress, Blogger...