Showing posts with label spellbinders die. Show all posts

Tuesday, 31 July 2012

Daisy Chain -Lili of the valley

Hello, sorry didn't get card finished in time for my usual Monday post.
But better late than never so they say.

Stamp used is called Daisy chain and its by Lili of the valley
I have lost my mojo at the moment things are not coming together how I used to be able to do.
Am feeling that this card is lacking something but cant think what
Colours used
Hair E31,E50 and pencil bistre 179
Skin E000, R20 and pencils Light flesh 132 , Cinnamon 189, warm grey 272
Dress R000, R00, C0
Socks R000,R00 C0
Grass YG63,YG03,G82
TeddyE31,E33,E35,E59 and pencil warm grey 272
Used a selection of flowers from wild orchid crafts
Here is the inside,
For this I made a little box  and inside I added .....
chocolates ...mmmm

The chocolates came with just the gold wrapper on but to add a bit more I gave each chocolate an outer wrapper using some of the designer papers I had used in the card.

 
Ok that's all I have to share with you today.
enjoy the rest of your day.
Thank you for visiting my blog. Please feel free to leave comment or ask questions about the cards I make. All comments are truly appreciated.
bYe ByE
for now
Klare
:O)
x

Saturday, 9 June 2012

Dainty Dancing card- Lili of the valley stamp

Morning,  Just had to ink up this stamp from Lili of the valley and share her with you. She's just so cute don't you agree.
So what did I use on this card... what didn't I used ..lol
the outer frame is Martha Stewart around the page punch
Design papers from my stash
I always seam to have some bit of ribbon on my cards
added some flat backed pears
there's a paper doily in there somewhere.
dies cuts used are spellbinders and magnolia doohickeys and memory box
also used some flowers from wild orchid crafts
The little cutie was coloured using copic markers and Polychromos Artists Pencils
Skin: E000, E00,E11,R20 , Light flesh 132 pencil
Shoes and Leotard: B000,B32 & Warm greys pencils V, II for shading.
Tights : R000
Hair: E40,E33,E35,YR31, walnut brown 177 Pencil
Ground and image outline shading: warm grey II- 271, warm grey V-274
I added a little extra this card. Its a sentiment that's hidden away behind the image
The inside of the card was finished to compliment the front of card using the same spellbinders die, added a sentiment printed off the computer and a few sick on pearls.

I would just like to say a very big thank you to all the people who visit my blog. I love to read your kind and thoughtful comments, I read every one of them and they make my day to think that you have taken the time out of your days to look at my blog and leave such kind and thoughtful words it inspires me to keep posting my creations and to know my work its appreciated.
Thank you!
Thank you for visiting my blog. Please feel free to leave comment or ask questions about the cards I make. All comments are truly appreciated.
bYe ByE
for now
Klare
:O)
x


Tuesday, 24 April 2012

Hot Diggity Dog - Chocolates and Mouse

Shhhhh ... don't tell any one but the sun has been shinning here all day ... not a rain cloud in sight... well not  from the view from my craft room window.
Finally got round to making this weeks card today...
I used the cute little mouse sat nibbling on chocolates.
I  used my usual items for colouring copic markers and polychrome colouring pencils
To the chocolate's I added glossy accents
It doesn't show very well but I tried to add extra 3d effect  by choosing parts of the chocolates and adding glossy/a  then let it dry ... then added the next section of glossy/a . So some areas of the choccies were more raised than others.
 You can just make this out on the top of the choccie with red bits.
Here I made 2 bows,  added one on top of the other ... glued a small rose on top and added a cute little  'made with love charm'.
To the bottom corner I added ribbon. Also so more beautiful little flowers.
Made a little envelope  used spellbinders  die to cut out the little greeting card. 
Inked edges and stamped sentiment.

For the inside just added papers I used on front  and a bit of same lace used.
Used a Martha Stewart punch to create the square to write your sentiment's on.

 Off to stables now to enjoy the last few rays of sunshine of the day.
Thank you for visiting my blog. Please feel free to leave comment or ask questions about the cards I make. All comments are truly appreciated.
bYe ByE
for now
Klare
:O)
x

Saturday, 25 February 2012

Magnolia's Little Mermaid

Morning, Well its sunny outside think springs on its way, Little lambs are in the fields, and the birds are tweeting and the temperature's making its way up the thermometer.
This month I have made a card to share with you and give you some inspiration and to get you crafting your own creative delights.
So today's card features magnolia's little mermaid stamp.
Cute little stamp isn't she, I used copic markers to colour her, I used a range of blues, greens and blue/greens all the lightest shades of the colour groups with a touch of cool grey here and there, for here fishy scales and shading, you should know me by now we have to have glitter so just picked out a few scales and her tail to add glitter. Used 2 colours of glitter one is silver and the other white iridescent with blues and greens tones in it, which compliments the colours used to colour her.
The skin tones were coloured with the usual combination of copic markers E000, E00, E02.
hair was coloured with E31, E35, E50. The background shading / shadows and tinge of shading on her face was achieved with polychrome pencils.

This picture just shows the stitching on the background layer. It all adds to the embellishment of the card. I only have a vintage sewing machine you know the type you crank the handle round. It was only cheap think it was £25 at a junk shop, But its been worth its money I've used it and better used it, for cards and cushions and the odd horse rug repairs.
On this card i used Kaiser craft peachy keen papers. The blues and browns and pattern on the papers, when so well with the colours I had used with the stamped image. So how do you start your cards? Do you choose the papers ? and then colour your image to compliment the papers? Or do you colour image first then hunt through your papers to see what works?
I do both, sometimes I have a paper I just have to use because I love it and, I have an idea of what I want to do with it. Other times its the stamped image that comes first with the colouring and how I want it to look. Then have to work round it with papers and embellishments to compliment and match. To embellish this card added seam binding, lots of pearls, pearl sprays, lace,
also used the Tim holtz alterations scroll work die, and the Mather Stewart branch punch.
The scroll work die looked like waves from the sea and the branch added a look of coral or seaweed. to carry on the nautical theme to the card.
So that's it your finished card.
I hope I have inspired you to create your own cards and projects.
The paperlane craft shop has many of the items used for this card in store. Some of what I have used is my own stash like the lace.
Thank you visiting this blog. Please feel free to leave comment or ask questions about the cards I make. All comments are truly appreciated.
please feel free to visit thepaperlane blogspot, or better still pop in the shop at northallerton.

bYe ByE
for now
Klare
:O)
x

Monday, 13 February 2012

Magnolia sitting on a swing card.

Good afternoon, The weathers a little bit warmer but I still have goose bumps on top of goose bumps. I really feel the cold. Give me a hot place any day. Roll on summer and hurry up about it.
Hope some of you popped along to the paperlane Demo day in store on Saturday.
Poor Cas had a few glitches, what with the power in store going off and of course everything these days been powered by electric was a bit of a nightmare for her so Big HUGS TO HER.
I popped in to see the  wonderful new stamp range  that my fellow D.T. member (Bev)  launched at paperlanes demo day.
Click here to see her work and the new
Uniko Studio's stamps.
Greats stamps, lovely quality, Also simple clean designs and up to date with toady's modern trends. I tried the cogs and pocket watch stamps at the make and take demo. These would look fab on any mediums you use your stamps on, and you get a lot of stamps for your money. Not only that the packaging is fantastic, Fabulous storage for your stamps, also keeps them clean and dust free, clearly labelled. They are currently on sale at
the paperlane Northallerton.

Made a card on Friday to share with you.
Thought I would try a tent card and here is the results of my efforts
Papers used were Prima Pixie glen,
Used the magnolia swing stamp and Tilda sitting upon it.
Swing I mounted it with eyelets and chain so it would actually swing back and forth.
The arrangement of flowers are a selection I placed together. These are from
The base of the tent card I had to cut in an oval  so when the card was close the base piece when folded didn't show in the main oval window.
Also added a few little embellishment's like ribbon and buttons and small dummy charm, as the card was for my daughter on the birth of my 1st grandchild.

Thank you for visiting my blog. Please feel free to leave comment or ask questions about the cards I make. All comments are truly appreciated.
bYe ByE
for now
Klare
:O)
x

Wednesday, 1 February 2012

This months paperlane challenge 'inspired by a book' - Alice in wonderland

Well I'm excited to say the Paperlane Challenges are starting again.
This months challenge is 'inspired by a book'

So with a little inspiration from Cas, as couldnt think how to tie the rubber stamps in to the book.
for my 'inspired by a book'
Alice in wonderland by Lewis Carroll which was wrote in 1865.Originally the book was called
Alice's Adventures in Wonderland but was commonly shortened to Alice in Wonderland
It is still a very popular book and enjoyable to both young and old.
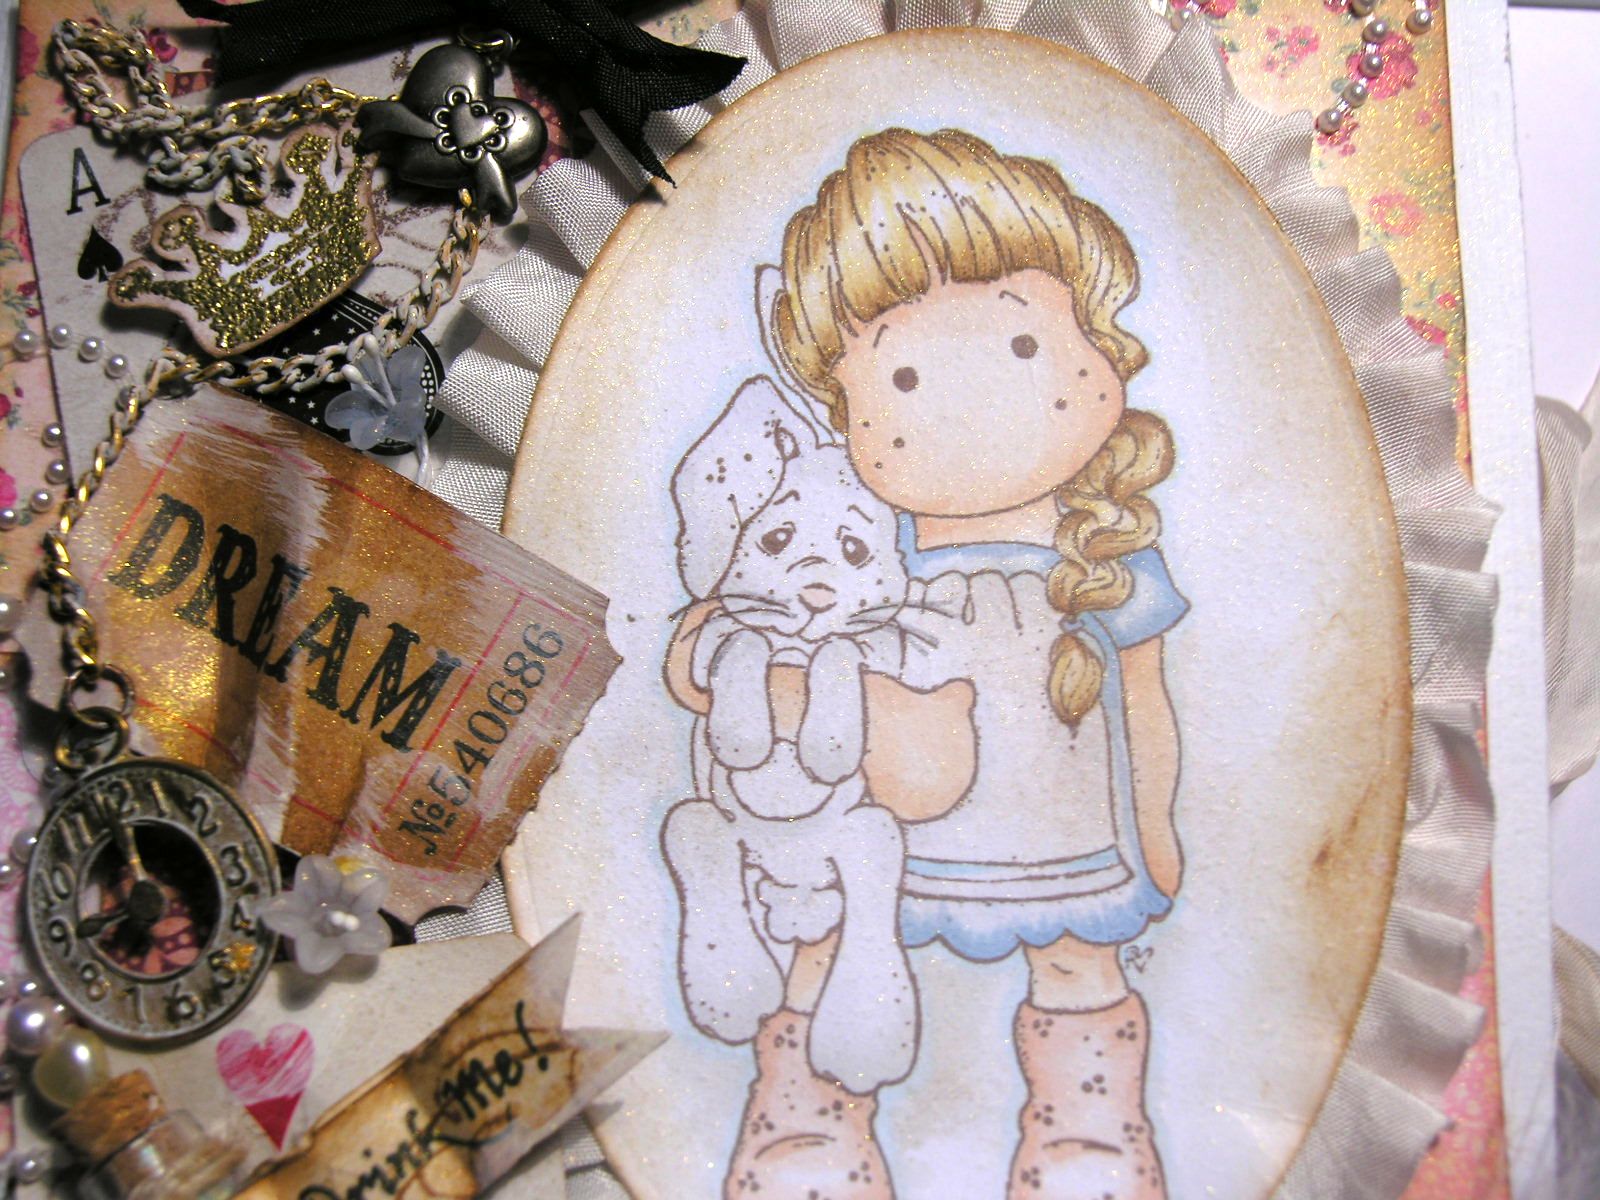
So on the cover of my book card I wanted to include many of the key elements of the book .
Used magnolia stamp to portray Alice and of course the white rabbit.
Added some Tim Holtz tickets distressed with vintage photo ink,
white paint and homemade glimmer mist.
Stamped and coloured with copics the toadstools.
Just behind the handmade  red rose is the Cheshire Cat.
For the bottle I used a Tim Holtz bottle , added perfect pearls and glossy accents, added the label an the gold key so she can grow small to enter the small door.
Added a watch charm as the white rabbit was late of course
Added the playing cards the crown and the heart charm  to represent the queen of hearts.
View from the side.
Inside my book card is a scrapbook mini album
you untie the ribbon closure
and open the little door and inside is a quote from the book.
This then opens to revel pocket pages.
In the pocket is a small tag. and a larger tag that slides out of the top of the pocket page.
Each tag has a quote from the book, theses can be used as photo mats or for you to
journal on the back.
over the page
Here's a look at the next pages again tags with quotes.
And here is the back page of the mini.

and lastly the back of the inside of the book with mini album

I got a little carried away on this project. There were so many elements and quotes from the book, that the project just expanded and ran away with me.
I have a few favourite quotes from the book.

If I had a world of my own, everything would be nonsense. Nothing would be what it is because everything would be what it isn't. And contrary-wise; what it is it wouldn't be, and what it wouldn't be, it would. You see?”

“If everybody minded their own business, the world would go around a great deal faster than it does.”    


“Speak in French when you can’t think of the English for a thing--
turn your toes out when you walk---
And remember who you are!”

 So now its your turn to show us on the paperlane challenge blog
A book that's inspired you!
Thank you for visiting my blog. Please feel free to leave comment or ask questions about the cards I make. All comments are truly appreciated.
bYe ByE
for now
Klare
:O)
x


Monday, 19 December 2011

All wrapped up

Hello,
So are you ready? As only six more sleeps till our gifts are given, New and old happy memories are shared and made. Or are you like me still wrapping and making gifts tags. So today I just wanted to share with you the tags I have made to go with my gift wrapping paper. Just a little effort and your gifts will look fab.
I needed tags to go on my gifts, didn't have any to match my paper so made these little gems.
I used lost and found paper, this was from my scraps box, Cut the tag shape free hand. Added some silver stickles and did a scroll pattern. Added the glitter glass to edges to give the frosty ice appearance to edges. Added the spellbinders shapeabilities Fleur de lis pendant to top of tag this was folded in half then secured with eyelet.
Then I cut out Tim holtz bird from the caged bird die cutter. Cut him out in card, took a page from my old falling apart dictionary and cut the bird out again, glued this to card. Used my embossing pen to add ink to places I wanted the embossing powers to stick too then added gold embossing powder and heat set. Did the wings the same way but after heat setting the gold embossing powder, went over again with embossing ink pen and added black embossing powder and heat set again. This gave the two tones of colour on wings. Added few feathers.

So here's the finished look. Added rustic twine and little bell. Tied bow around gift and added the tag.
Hope you all have a lovely Christmas.

Thank you for visiting my blog. Please feel free to leave comment or ask questions about the cards I make. All comments are truly appreciated.

bYe ByE
for now
Klare
:O)
x

Tuesday, 22 November 2011

Nellie Snellen Flying Frog (gift book)

Sorry I've not posted for a little while. You know how it is sometimes you loose your crafting mo jo and am busy with other things.  Now the dark nights are here I've been busy during the day with the horse. Hes been taking up a lot of my day, and with limited daylight hours its difficult at times to get done what I need to get done.
I have had this little stamp a while and have not inked her up yet. Shes from the Nellie Snellen range.
I didn't do a card this time, I would call this a gift book.
They are easy to make.
The pages are made by concertinaed card. You make 4 and interlock them to form frame.
When stuck down in to the cover of your book.
The frame leaves a recessed area.
Which can be used as I have to leave your sentiment.
Or you could fill with a small gift like candy bars.

Just thought I would share a few cute pictures of my daughters dog.


Thank you for visiting my blog. Please feel free to leave comment or ask questions about the cards I make. All comments are truly appreciated.
bYe ByE
for now
Klare
:O)
x
PS. Not long left to get your entry in for this months Challenge at the paperlane
this months challenge is Snowflakes-and-Sparkle
If you dont manage to make this months challenge why not join us with the next one,
Show us what you can do and you can even win a fab little prize for your efforts.


Related Posts Plugin for WordPress, Blogger...